
Binding made Easy!
I luv quilting and the binding is my favorite part of making a quilt.
I would like to share a few of my binding tips with you
and hopefully I can ease your binding fears.
You will see how easy it is to achieve nice mitered corners....

.....and how easy it is to join your binding ends
using a 45 degree angle seam.
You will not be sewing on a cut bias
so no stretching as you join the binding ends.
using a 45 degree angle seam.
You will not be sewing on a cut bias
so no stretching as you join the binding ends.
MAKING THE BINDING
Binding strips are usually cut at 2 1/2" or 2 1/4 '' wide and
sometimes narrower depending on the quilting project.
sometimes narrower depending on the quilting project.
Most quilters use binding strips cut on the straight of grain, WOF.
If your quilt has scalloped or curved edges you would always cut your strips on the bias
....but some quilters always use bias vs straight of grain especially on
lap and bed size quilts because
....but some quilters always use bias vs straight of grain especially on
lap and bed size quilts because
bias bindings are stronger and wear better over time.
I usually use 2 1/2" strips with a 3/8" seam allowance for lap size and larger quilts
and 2 1/4" strips for wall hangings and table runners with a 1/4" seam allowance.
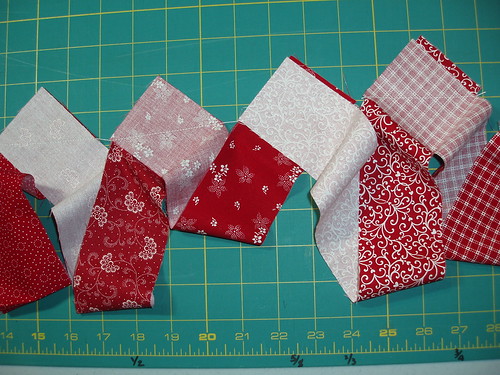
Scrappy bindings work well on scrappy quilts by joining 15" - 18" pieces,
even shorter pieces if you don't mind all the seams.
I luv scrappy binding look.
Lets start by joining your binding strips at a 45 degree angle.
I use the strip piecing method to join my strips.....
now trim the binding triangles off leaving 1/4" seam....
...press the seams open.
Press the long edge of your binding in half with wrong sides together,
keeping raw edges even.
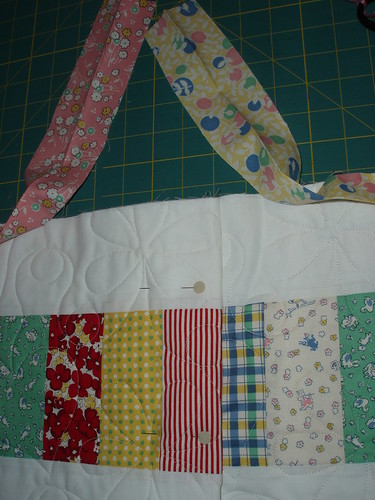
Allowing the quilt to fall off your sewing table makes it
difficult to keep an accurate seam allowance.
difficult to keep an accurate seam allowance.
If possible, support your quilt on a table
when you are sewing the binding to your quilt sandwich,
when you are sewing the binding to your quilt sandwich,
this avoids any drag or
pull that can cause the seam allowance to get narrower.
pull that can cause the seam allowance to get narrower.

SEWING THE BINDING TO YOUR QUILT
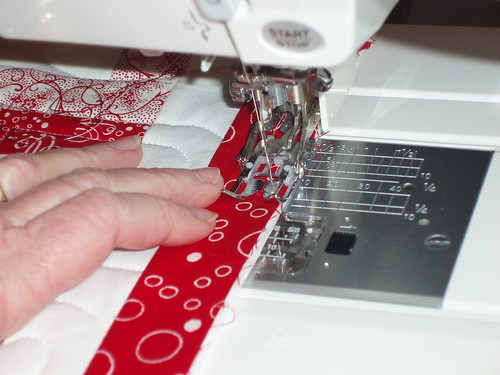
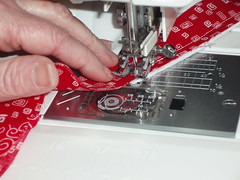
Your best friend for this will be your walking foot.....
leave a binding tail of about 12"....
start in the middle of the quilt sandwich
with the binding on top of the right side of the quilt......
stitch a 3/8" seam allowance....
keeping the raw edge of your binding and the raw edge of your quilt even.
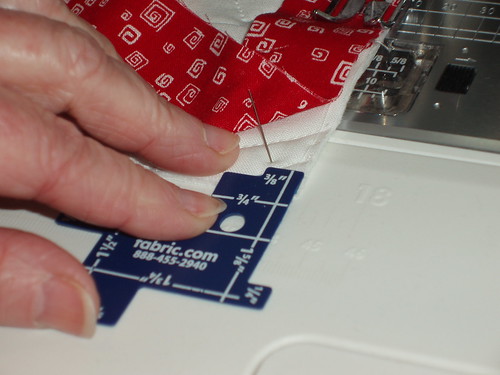
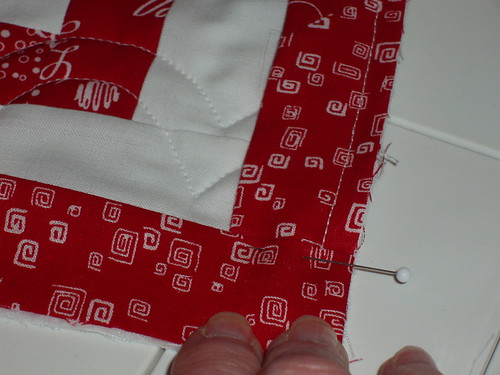
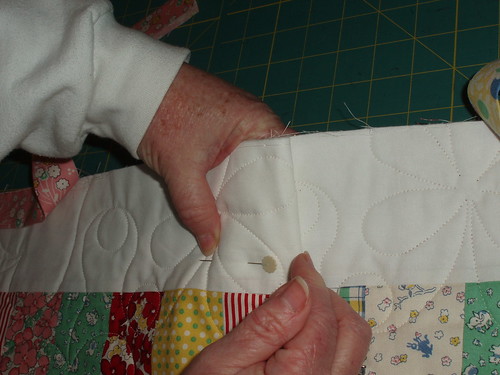
Stop stitching about 6" from the corner....
with a pin mark the binding 3/8" from the bottom and 3/8" in from the side of the quilt.
accuracy is important here.....
now continue stitching.....stopping at the pin......
with needle down in the machine, lift presser foot
and pivot quilt to stitch at an angle through the corner.
and pivot quilt to stitch at an angle through the corner.
Remove quilt from machine.
Fold binding to the right over itself at 90 degrees creating a 45 degree fold.
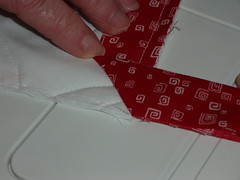
Fold binding back over itself to the left creating a fold.....
line up the fold with the side you just stitched.
Starting at the fold
start sewing the binding to the next side of your quilt.....
remember to stop about 6" from the corner
to mark your 3/8" seam allowance with a pin.
remember to stop about 6" from the corner
to mark your 3/8" seam allowance with a pin.
Continue sewing around the quilt....
stopping about 18" from where you started.
stopping about 18" from where you started.
JOINING THE BINDING USING A 45 DEGREE SEAM
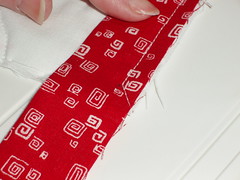
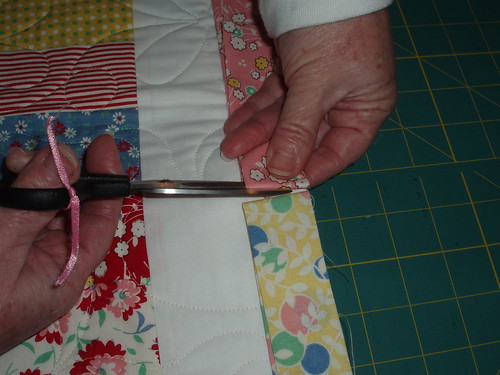
Fold both sides of the binding so the 2 folds butt up against each other
in the center of the opening.
in the center of the opening.

cut left side at fold
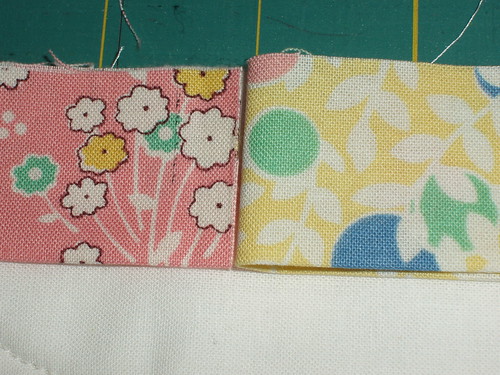
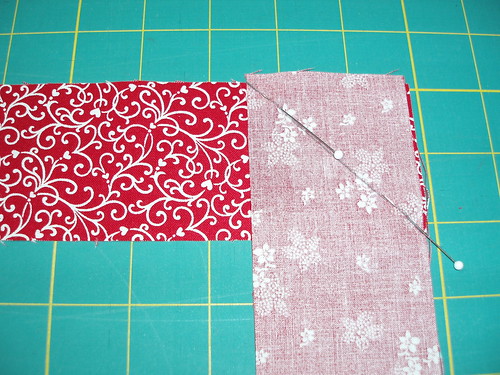
Using the piece of binding you just cut off....
open it flat and lay it against the fold on the right side...
open it flat and lay it against the fold on the right side...

**the over lap will equal the width of your binding strip....**
be careful not to cut the bottom binding.....
use scissors and cut along the right side of the binding
be careful not to cut the bottom binding.....
use scissors and cut along the right side of the binding
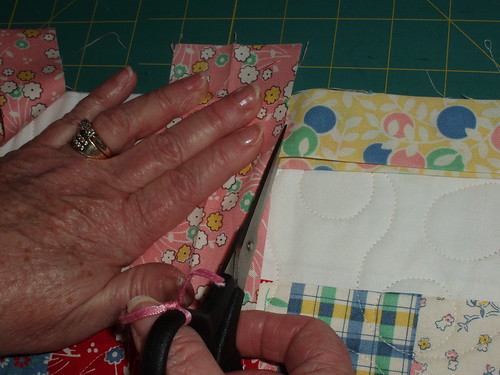
Make a big pleat with your quilt in the center of the opening.
This makes it easier to sew the bindings together on the 45 degree angle....
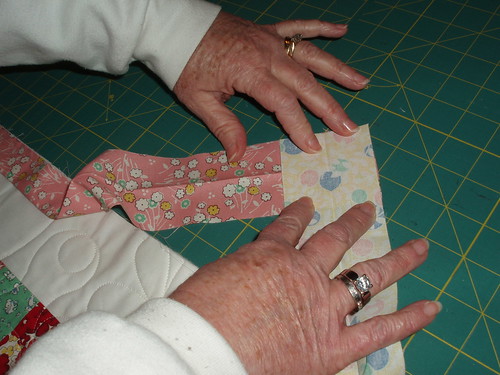
Place left side of binding on the table right side up...open flat.....
Take the right side of binding...open flat....right side down over the left side as shown......
in other words right sides together just like you joined your binding strips....
be careful not to twist the binding and
make sure the raw edges are even.
be careful not to twist the binding and
make sure the raw edges are even.
Draw the 45 degree stitching line and sew

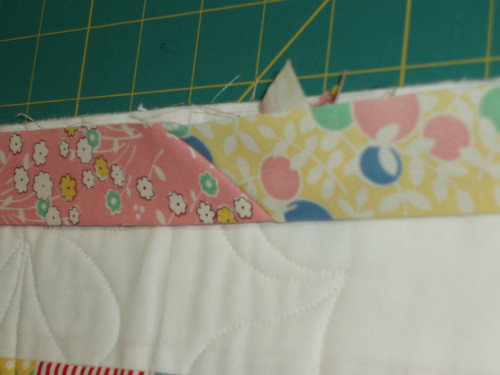
****Before you trim the binding triangle off ****
- unpin the pleat to check that your binding isn't twisted
- and the binding is the right length to fit perfectly flat on your quilt
- if it looks good......trim the binding triangle off and finger press seam open
- Sew the remainder of the binding to your quilt sandwich.
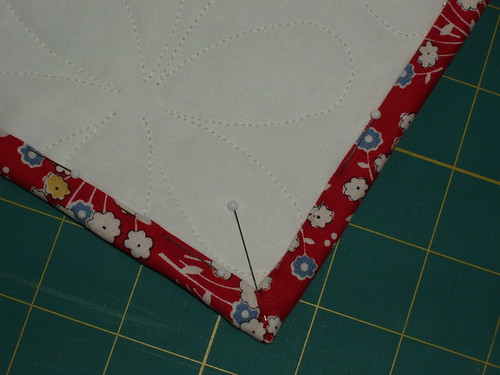
Fold the binding to the back of your quilt and you should have nice mitered corners.
I pin on both sides of the corner and adjust the sides of the corner till they line up perfectly.
If you have struggled with bindings in the past
I hope I was able to ease your fears.
I hope I was able to ease your fears.
If you have any questions please email me.
hugs and happy stitching

I didn't read your original tutorial but I wish I had! I love the binding too but I'm never completely happy with the join ! it's always bulky, this looks simple - I'll definitely be trying your way - Thanks!
ReplyDeleteI had not seen your binding tutorial before. I started quilting December of last year so it predates me. I am thankful for each binding tutorial that I read as I pick up a trick or a tip off each one. Thanks for the great giveaway.
ReplyDeletehttp://richardquilts.blogspot.com
This works every time!! I just had someone show me how to do a binding this way! I'm not sure if I read the post or not...but I will, afraid I might miss something! thanks for the fun!!
ReplyDeleteHello! I remember reading your tutorial on Sew We Quilt as I follow her blog too
ReplyDeleteAnd I also follow your blog. Congratulations on reaching 600 !!!
ReplyDeleteI'm a follower. To be honest I must say I can't remember whether I've read the tutorial before.
ReplyDeleteThanks for this tutorial! I am a follower but do not remember the previous post. I had learned this angle joined technique before but had forgotten that last bit. Thank you for making it clear again.
ReplyDeleteGreat tutorial! I need a repeat class anyway...read it but like reading it again! I follow you religiously! lol
ReplyDeleteI am already a follower but I missed this tutorial previosly. Thanks for it. I love the tip about using the open width of the cut strip to determing how much width you need to cut the second strip.
ReplyDeleteI follow your blog and definitely read your great tutorial on Sew We Quilt in February 2011 Pauline. It's a great tutorial.
ReplyDeleteI am a follower. This is the first time I've seen this tutorial, but it comes just in time. I have a quilt I need to bind and this helps tremendously.
ReplyDeleteGreat tutorial Pauline. I am a follower, but I missed your tut the first time around. Congratulations on the 600+ followers, and thanks for the great giveaway.
ReplyDeleteHappily following you via GFC+Blog Lovin'!
ReplyDeleteThank you for sharing!
msstitcher1214@yahoo.com
HELLO!I DID MISS THE EARLIER TUTORIAL-BUT I DIDN'T MISS TODAYS-THANK YOU!
ReplyDeleteCONGRATS ON 600+!
HAPPY QUILTING!
msstitcher1214@yahoo.com
Wow Pauline, great tutorial! It's always challenging to me to make those bindings match up. No I did not see the prior posts at SWQ. I can hardly keep up with the blogs that I read, so I had to cut back on how many I read. Thanks for sharing this again. It's great information. Hope you will share more tutorials.
ReplyDeleteThis method does work perfect. Thanks again for the refresher course on binding especially the joining!! .....corners I get, but struggle everytime remembering how do this method of joining. (it's so long between bindings for me .......tops tend to stack up and not get quilted and then my soft mushy drive(brain) is full or the search feature doesn't find it, lol). I need to tack a copy of this to the wall by the sewing machine for when I do need it. Thanks a million!!
ReplyDeleteHi, I'm a follower. I tnihk I read the tutorial on
ReplyDeleteSew We quilt. Nevertheless it's such a good one that reading it twice doesn't hurt a bit. Thank you very much.I've tried it and it's a wonderful method.
Congratulations on 600+ followers, of which I am one of them. I think this is a new to me tutorial. Thanks for all the great information and giveaway.
ReplyDeleteI don't think I'd read your binding tut before. I have read others. I've been doing bindings for forever but I've always struggles with the mitered corners. Mostly I would just round them but unless you use the bias binding, the corners puckered.
ReplyDeleteSo I really appreciate yours and other tuts about the corners. I keep trying and my corners are getting better, much better. I also didn't know about bias being stronger. Good to know. Thanks. It is great info.
I actually printed a couple of key ideas and taped them on my wall to remind me how it is done - has worked good since. tnx for the great tips
ReplyDeleteI'm a follower, but I did not see the original tutorial. Thanks for sharing it again and for the giveaway!
ReplyDeleteI have just started back into the quilting obsession after a move, so I had not seen your great tutorial yet. It is wonderful! Thanks for the chance to win such a wonderful prize pack!
ReplyDeleteThank you for the binding tutorial! I am new to quilting and so far my corners suck! Can't wait to try again.
ReplyDeleteI am a follower too :)
Love your binding tutorial, both times!
ReplyDeleteI missed the first one but glad to catch this one, many thanks for the giveaway.
ReplyDeleteCongratulations on 600 posts! :) I'm a follower.
ReplyDeleteI was wondering how to get the 45 degree angle at the end. I always just butt the edges together straight. I am a follower. This is the first time I have seen this binding tutorial.
ReplyDeleteI don't think I've seen your tutorial before. Thanks for the helpful info! I'm going to try sewing diagonally to the corner on bindings like you suggested. :)
ReplyDeleteQue linda você,obrigada.Eu costuro a tempos mas quem fazia os arremates para mim,mudou-se para longe,e eu vi o seu tutorial no SEW,e gostei,revendo agora acabei de aprender,vou já para máquina fazer em uma pequena de minha neta.Muito obrigada por tamanha generosidade dupla.Um beijo e parabéns.
ReplyDeleteAwesome tutorial.....I was a little afraid when you cut the ends off.....but it totally makes sense! I'm trying that on my next binding. And I pretty sure I found your blog from seeing you on Sew We Quilt! Yay!
ReplyDeleteThanks for the chance!
thank you for the tutorial. I hadn't started sewing back in 2011 so it was new to me. I am a follower too :)
ReplyDeleteThis is a new to me tutorial.I am a new blog follower because I have not had high speed for very long.It was not available.Congrats on 600+ followers I well understand why we "tune " in to your blog.I am enjoying it and this tutorial.
ReplyDeleteI am a follower and this tutorial is new to me (have only been quilting since last fall)
ReplyDeleteI'm already a happy follower but your easy-to-follow tutorial is new to me..thanks for sharing!!
ReplyDelete~Terry~
I follow your blog, but did not see the tutorial on Sew We Quilt. Congrats on all your followers!
ReplyDeletei'm one of your 600 ... and read all your posts and will try to post more to your blog. winning that charm book would give me a few more ideas to use my charm pax.
ReplyDeleteIt was after Feb 2011 when I really started reading blogs so this is the first time I've seen your tutorial. I'm one of your many followers!
ReplyDeleteyes, i read your tute on mme samm's ... at my age i need to see these how-to's often, lest i forget how to!
ReplyDeleteGreat tutorial I enjoyed it the first time around at sew we quilt and this time too. It is good to have a reminder.
ReplyDeleteI have not read your tutorial previously so thank you for posting it again. It looks very easy to follow.
ReplyDeleteI haven't read the tutorial on Sew We Quilt but I loooove binding!
ReplyDeleteI did not see the tutorial prior to this...I am a follower, but do not have a blog. THANKS! carent1@neb.rr.com
ReplyDeleteI am a follower. I don't mind binding. I can't say it's my favorite part but I don't mind it! I do, however, love charm packs!
ReplyDeleteI always read the tutorials on Sew We Quilt! This is great, and your quilts are beautiful!
ReplyDeleteThanks for the tutorial. I usually read the tutorials on Sew We Quilt...don't know how I missed this back in February! I am a happy follower. Thanks for the chance to win your giveaway!
ReplyDeleteI am already a follower and no I didn't see the tutorial back in 2011; I've only been checking out the quilting blogs for the last 6 months or so. It is a good tutorial; I always struggle with finishing off where the binding starts/ends, so thanks for the tips. Thanks for chance to win too! (EMAIL: marshudson at comcast dot net)
ReplyDeleteI read your original tutorial. In fact, it is a bookmarked URL! :-)
ReplyDeleteCongratulations on over 600 followers. I am one of them! I can't remember if I have seen the tutorial before but it never hurts to have a refresher! Thanks for the lovely giveaway.
ReplyDeleteThanks so much, I stumbled onto this post at the perfect time. I need to put the binding on 2 wall quilts. Great tutorial, great timing. Thanks again, ;-> Toni Anne
ReplyDeleteI love your tutorials. They are great! And you are definitely the best at binding!!
ReplyDeleteI have not seen your binding tutorial so it is new to me. I will be bookmarking it though for future reference. I always seem to question myself and have to refigure it out every time I make a quilt.
ReplyDeleteThank you for the great instructions on how to do the binding I can never get it right the 45 degree angle now I am going to try your way.
ReplyDeleteI am a happy follower!! Thanks for this fantastic tutorial, I have learned how to do the binding in a similar way; however, I always get it twisted when I join the ends... grrrrr!
ReplyDeleteI can't remember your tutorial from February, so happy that you posted it again! Hope you don't mind if I Pin it on my Quilt and Sew board for future reference. Thanks again!
ReplyDeleteyes to I am a follower and that I saw your tut a way beack last feb. great tips and I have used them many times since.
ReplyDeletealso thanks for hosting a give away.
in stithces
I'm a follower. I don't remember if I saw your tut from February but I have seen someone like this.
ReplyDeleteI am a follower. I don't remember if I saw your tutorial or not, but I have seen one that is simular. However, I like the way you did your corners. This is new to me so thank you very much for making it easier to do the angle. And thanks for the giveaway.
ReplyDeleteWonderful tutorial on binding, that sure was a quick trip but better than not seeing the grandchildren at all. I am a relatively new follower and I am enjoying your blog.
ReplyDeleteI am a follower and I really love your tutorial on binding. The last part is so hard to understand for me. With your pictures I really feel I can now do it! Thanks so much.
ReplyDeleteI am a new follower. The tutorial is new to me as I have only recently started reading quilting blogs.
ReplyDeleteI am not a new follower, but apparently was not following when you posted this the first time, as it is new to me. Thanks for sharing it again!
ReplyDeleteIm a follower and this is my first time seeing the binding tutorial! Thanks ;)
ReplyDeleteI follow your blog!
ReplyDeleteThe tutorial was very easy to follow along to. I am not sure if I read the original tutorial or not. I also follow Sew We Quilt so I may have. But I was not pinning at that time so this time I have pinned it to my quilting tutorials so I can find it easily for future reference! Thank you!
ReplyDeleteI'm a follower.
ReplyDeleteI follow your blog. This is the first time I've seen this tutorial and it is a great one!
ReplyDeleteI didn't read the tuto before, so I am thankful to find it here. It's great.
ReplyDeleteGood that I follow your blog, so it appears here.
Thank you for the tutorial...it's new to me as I just recently found your Blog! I always believe that a picture speaks a thousand words and your tutorial was perfect!
ReplyDeleteVanessa in Oklahoma
Not only did I read it the first time, I've made notes, complete with drawings, on the spots I always get stuck on and I have them in a notebook in my sewing room! Glad you got to spend at least a few hours with the grandkids!
ReplyDeleteI am a follower and now I know why. I had seen your binding tutorial but lost it. I found a couple of others that I have tried to use but they have been an exercise in frustration. Yours worked the first time with no problems so I am bookmarking it, printing it out and using it to wallpaper my sewing room wall (maybe not the last one!!)
ReplyDeleteI was just thinking tonight while I struggled with binding my children's BINGO cards where I could find a well written, easy to follow tutorial, turned on my computer and there it was.
SO THNAKS, THANKS, THANKS, THANKS, THANKS!!!!! You are awesome!!!!!
I always like to see how other people's binding methods. It's such a simple part of the quilt yet there's a lot of different ways to do it. :) I'll have to go back and read the post in February and see if it's something I've read or not! Thanks for the tutorial.
ReplyDelete-rhonda
I'm a follower and this is a great tutorial. I don't remember seeing the other. I admire all your quilting genius. Have a great day!!
ReplyDeleteGlad you made it safely to and from Canada and had a nice visit with the family.
ReplyDeleteI saved the tut last time on my computer and printed a copy to leave with my quilting group.I followed it each step of the way to do my first ever binding and it only took me two tries to get the final join to not be twisted.I drew the line the wrong way. Now I look at the picture before drawing the line.
This is the first time I visited your blog and I bookmarked it so I can find your binding tutorial again. Thanks for posting it. Joan
ReplyDeletesales@honeyhillfarm.com
Hello, thanks for sharing this tutorial! I think I may have read it before, because the way you sew the ends together rings a bell. It's the same way I do it (after trying several methods) so I may have gotten it from you :) Over time, I have modified the way I do it and borrowed ideas from all different places/people/tutorials. Congrats on sew many followers! I think you might get even more if you move the Google Friend Connect to the top of the layout (on the right). It required a lot of scrolling to find, but I did! Just a suggestion. They used to have a follow button at the top of blogger, but they do not any more. Anyway, glad to be a follower!
ReplyDeleteI might have seen that tutorial but it was a while back but it is good to have a refresher.
ReplyDeleteThat little gadget is interesting.
I have seen the sewing line at the corner done at the angle and straight across where it is parallel to the side you are getting to ready to go around.
Have you tried that? Just wondering if you can tell a difference as to which way makes a better corner.
I didnt find Sew We Quilt until last month sew I did not see your tutorial over *there* but I am glad you reposted it sew I know its *here* when I need it! :)
ReplyDeleteI didn't see your binding tutorial before as I just started quilting in March. But this looks like a great way to do the binding. Congratulations on 600+ followers! :)
ReplyDeletebcgeates at netbistro dot com
I'm a follower of your blog via gfc! :)
ReplyDeleteThanks for the tutorial. I don't think I had seen it before. I am a follower and I'd be thrilled if you would enter me in your giveaway.
ReplyDeleteI already follow your blog and read the original stash manicure post. And, I realized as reread your tutorial post today that I use the same little blue gadget - thanks to YOU! Thanks for the celebratory giveaway and congratulations on the huge count of followers.
ReplyDeleteI am a happy follower and this is the first I have seen your tutorial...makes it easy to see with pictures. I have "my way" but bookmarked your way to try! Thanks!
ReplyDeletePretty sure i did see it the first time too. I'm a happy follower. ;-)
ReplyDeleteI have followed tyou for a long long time, Miss Pauline - and I did read this tut on Mme Samm's - and one more time is most excellent - a quilter can never read too much about binding !
ReplyDeleteCongratulations on 600 post,that`s great.
ReplyDeleteYes,I`m a happy follower.I don´t remember if I saw the other but think I did it.Thanks!
Congratulations! I have been using a tool to help with the corners, but have not been entirely happy with the results. I am going to try this method next time - thank you. I did not read this on Sew We Quilt.
ReplyDeleteCongratulations on your 600+ followers. I read your tutorial and am forever grateful for your tip about putting a big pleat...and pinning it...in the quilt to get those ends to lie under the sewing machine easily...such a simple solution...:)
ReplyDeleteI think I did read the original Tut but i've bookmarked this one, for future.
ReplyDeleteCongratulations on 600 posts and I'm a happy follower :)
Great tut. This is exactly the way I learned to do it. I read the original tut too. I never miss anything over at SWQ.
ReplyDeleteCan I tell you a great big thank you for this tutorial!! My biggest is the ending and you have made it SO simple!! Thank you!! Oh, and I am a follower!!
ReplyDeletethis is a new to me tutorial....and in time too! I just finished 6 quilts, and have the binding ready....I was doing one and completely forgot how to meet the ends once it's on the quilt! thank you!
ReplyDeleteThis is a new to me tutorial and I love it! I cannot wait to try your method!
ReplyDeleteThis is my first time seeing the tutorial! Thank you!
ReplyDeleteThis will be a great help to me, as my bindings need improvement! I read your first tutorial on Sew We Quilt too.
ReplyDeletethanks Pauline...I just finished another quilt because of YOU!
ReplyDeleteOh. My. Goodness.
ReplyDeleteYou're brilliant. that is all. :)
Thanks for the tutorial. I am finishing a table runner for our quilt guild and this is my go to binding tutorial.
ReplyDeleteYesterday I spent a couple of hours marking across the diagonal for the seam, trimming the seam, and helping to iron. My friend did the sewing and did some of the oops, not ironing but pressing. She said she was going to look for someone to bind the quilt for her grandson. I told her she could do it. So, yesterday after we got back to her house from the movies, she already had the binding strips cut, we got busy and we got the binding prepared and even wound on an old large medicine bottle. I told her about your wonderful binding tutorial that I always use. I gave her an oral overview and I just sent her the link. BTW - I won an embroidery from you and I owe you a handwritten ty. I am in love with it.
ReplyDeleteI found this I'm so happy with your technique it works and looks so nice!
ReplyDelete