
I feel as I've been preparing to go on a trip and the day has finally come
.....just a wee bit excited
.........my first time as a guest blogger at Stash Manicure.
I'll be talking about :
BINDING:
PREPARING YOUR BINDING,
PREPARING YOUR BINDING,
CORNERS,
AND JOINING YOUR BINDING ENDS
AND JOINING YOUR BINDING ENDS
There are many ways quilters attach and complete the binding process.
To some... this is the part of making a quilt a lot of quilters struggle with.
Hop on over to Stash Manicure
read my tutorial and then come back and enter my giveaway:)
The winner will be able to choose their gift...
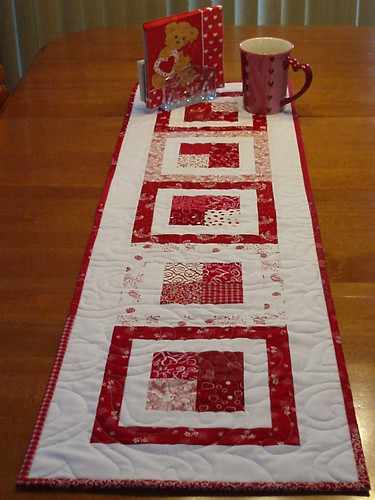
1. The table runner is quilted, bound and ready to gift....or
2. Two charm packs of Lily and Will II....or
3. Visit Crazy Quilt Girl Fabric Shop and if you see 2 charm packs
you can not live without.... let me know which 2 they are.
TO WIN....
...be a follower of Stash Manicure and leave a comment on Stash Manicure
... follow or become a follower of my blog QuiltnQueen
leave a comment telling me which one of the 3 prizes you would like to win
just say 1, 2 or 3 then
.....tell me something... like......what you found most useful about this post
or say "that is exactly how I bind my quilts" or
.....something like I've got # sewing machines.
Please make sure I have an email to contact you.
The drawing will be on February 14...Valentines Day
I hope you enjoyed my post....Thank you for your comments:)
read my tutorial and then come back and enter my giveaway:)
The winner will be able to choose their gift...
1. The table runner is quilted, bound and ready to gift....or
2. Two charm packs of Lily and Will II....or
3. Visit Crazy Quilt Girl Fabric Shop and if you see 2 charm packs
you can not live without.... let me know which 2 they are.
...be a follower of Stash Manicure and leave a comment on Stash Manicure
... follow or become a follower of my blog QuiltnQueen
leave a comment telling me which one of the 3 prizes you would like to win
just say 1, 2 or 3 then
.....tell me something... like......what you found most useful about this post
or say "that is exactly how I bind my quilts" or
.....something like I've got # sewing machines.
Just one comment on Stash Manicure and
one comment on this post.
Please make sure I have an email to contact you.
The drawing will be on February 14...Valentines Day
I hope you enjoyed my post....Thank you for your comments:)
Here is a summary of the tips in my tutorial.
1. Use a walking foot to attach your binding to your quilt.
2. Always start with square corners....square up your quilt with a large square ruler.
3. Always leave the binding tails about 12" long and your opening about 18".
4. Pin a pleat in your quilt at the opening before joining your binding ends.
(this makes it easier to work with the binding ends)
4. Pin a pleat in your quilt at the opening before joining your binding ends.
(this makes it easier to work with the binding ends)
5. The width you cut your binding strip...say you cut it 2 1/4"
OK then.... the amount of extra binding you will need is 2 1/4"
when using the 45 degree angle method to stitch the binding ends together .
Do you want to know why I use a piece of my binding to measure...
I know it is the right length ....and I don't have to look for my tape measure.
Accuracy is important for the binding to fit perfectly flat in the opening.
If you have any questions...... send me an email and I'll be glad to help.
You will be surprised how easy it is.
************GIVEAWAY IS NOW CLOSED************
Hugs from Michigan


2, I loved your tutorial, I HATE doing binding, mostly because I am sooooo close to being done with the quilt, that I just want it finished.... but loved the tutorial, and will try some things! Thanks
ReplyDeleteNumber 3. Your tutorial was very good. I also like doing binding. I started out as a hand worker, not very comfortable with machines. I get great pleasure in finishing up the binding. I am a new follower with 2 machines, but only one is used. It replaces my first one that doesn't have all the gadgets for quilting, and I need all the help I can get!
ReplyDeleteLeslie S. in MN
esclante at comcast dot net
Great post--thanks for the helpful information. I liked the info about how to measure for the right amount of overlap in order to join seams on a 45 degree angle vs a straight seam.
ReplyDeleteI am now following you by adding to my Google Reader--does that count? If not, that's okay.
It's always nice to find a new blog and in turn see who you like to read and check out those blogs. I'd love to choose the Moda Buttercup charms if I'm picked.
Thank you,
ttr3@earthlink.net
Pauline, this is a wonderful post. Great ideas and tips for binding. You have done an excellent job explaining all aspects in great detail. I have picked up lots of tips. Fantastic photos, too.
ReplyDeleteCongratulations on a great tutorial!!!
Don't put me in the draw - I have already been very lucky.
Number 3
ReplyDeleteI have 3 sewing machines in this room (and one serger). One is the main one I use, one is used strictly for scrapbooking (sewing on paper) and one is the machine I used before I got a good one, it is now my backup if something goes wrong!! I also have an antique treadle machine in a cabinet. Thanks for the tutorial. I can always learn something from someone that knows what they're doing. One thing I just did NOT get from binding tutorials when I started out about 3 years ago was NO ONE tells you how to sew the back down. They just say to do so. LOL!
I am now a follower.
1. - great instructions as a newbie finding good instructions with pictures is always very helpful.
ReplyDeleteNumber 2. This is mostly how I do my binding but I've never seen the suggestion to use the scrap of binding to measure the cutting point when joining the ends before. Good one!
ReplyDeleteNumber 2
ReplyDeleteJust looking back through your blog. Looks great! Isn't blogging world fabulous? So many beautiful things to see and to enjoy with like minds.
#1 - a new follower (off to explore the rest of your blog with my first cup of coffee :)
ReplyDelete# 3. I "only" have one basic sewing machine, dreaming of a new. But as a quilting beginner I think I have achieved to make several nice quilts with it. Following both of the blogs, thanks for your great tutorial.
ReplyDelete#3 I enjoyed your excellent tutorial; I'm looking forward to trying your method. I'm a new follower
ReplyDeleteAgain #1 Love your work! Thank you for this tutorial. I will try it!
ReplyDeleteSusanne
#1. Beautiful table runner. your tutorial is excellent. I always dread the binding but this method of joining looks much easier than what I have tried before so will definitely be giving it a try. I am now following your blog :-)
ReplyDeleteLove the table runner. I have come over from stash manicure and am now a follower. Number 3 would be my choice please if I was lucky enough to win.
ReplyDeleteHello Pauline love love love the table runner sew I will love to be in the draw for # 2 NOOOOOO ...
ReplyDeleteNo #1 for sure...I want to see live those perfect bindings that you are famous for....lol.
Great photos, great tut...proud of you....
Thanks for your tutorial. I have never tried sewing off to the corner at an angle so I'm off to try it now, it could make all the difference.
ReplyDeletePauline,
ReplyDeleteThank you, as a new quilter I need all the help I can gather. This is a wonderful tutorial.
I love #1, the table runner.
Hugs,
Joyce
3 - I'll try your way of binding (great tutorial)
ReplyDeleteThanks for the GREAT tutorial!
ReplyDeleteI like #3 - Hoopla and Haunted Mansion!
I follow you and Stash. Awesome tutorial!! So proud of you. I would take your runner or #3 Sherbet Pips?? LOL
ReplyDeleteXOP
Thank you for the GREAT methods for binding. The pleat for joining the ends is the best tip for me. My choice is #1!!! Beautiful and having a sample to view...priceless. Kinda ashamed to say I have about 19 machines...featherweights, treadles from GGmas, 301,serger, and longarm. The machine I actually sew on is a Janome workhorse like yours! Becoming a follower...
ReplyDelete#1 please - lovely runner, I have a project planned to use this technique
ReplyDeletethanks for the giveaway
My choice is number 1 - I am binding challenged! I hand stitch them. I am going to give your tutorial a try - the runner is beautiful!
ReplyDeleteWow - that Linda above me does have the machines! I have one :) my Viking from 1980
thanks!
just clicked follow on your lovely blog! #1 is my choice, great binding tips!
ReplyDeleteI am a new follower. So glad to catch your post on Stash Manicure. The tip I like the best is to end the binding at the corners with an angle to the corner. Glad you make more sense than I do!!
ReplyDeleteI really enjoyed your post! I'll have to try the sewing diagonal bit on the corner. I have 4 sewing machines and I'm now following your blog through bloglines. I would choose prize #3.
ReplyDeleteI would love to win the tablerunner. It is gorgeous! I just became a follower and can't wait to read all your past blogs that I've missed. Your tutorial is great, I'm saving this one, I'm a terrible binder and want to try your style. Thanks for the opportunity to win your giveaway!
ReplyDeleteThank you for directing us to your great tutorial and your tips above:)
ReplyDeleteI posted on the other blog as I was already a follower
I also follow your blog. I am excited to use your tutorial for a quilt kit I just ordered. I know with your help I can do it.
Thanks so much for the giveaway. I would be so grateful to win #1:)
Ann Flowers
flowerscrazyq@gmail.com
Awesome tutorial! And sweet giveaway!! I, of course follow your blog!! I would love #1! Thanks, Pauline!
ReplyDeletePauline... I love your name. When I was young my brother would tease me by calling me "Pauline Michelle" (my name is Paul Michael), whenever I see the name Pauline, I hear my little brother's voice.
ReplyDeleteI learned this method from the person who taught me to quilt. I LOVE the idea of pleating the quilt with a large pin to ease the tension, I will definitely start doing that!! I bought a special binding ruler, but it just doesn't work quite as well.
Since you asked... If my number is picked, I LOVE the Moda Marbles Citrus, and Moda Marbles Bright packs.
Thanks for the tutorial. The only part I don't understand is the corner. Do you sew across it diagonally before you flip it up to start down another side?...are your machines old ones, new ones or a mix? I have a treadle, an old electric (about 100 yrs old) and one from about 1930. I love them!...OH, and number 3 if I win! Thanks.
ReplyDeleteI would chose to win #1. Your tutorial was very helpful, always good to see different ways to get binding on.
ReplyDelete#2 - I am a new follower. Loved your post on Stash Manicure.
ReplyDelete#4. Never heard of that tip and I will give it a try.
ReplyDeleteThanks for this post. I learned how to end my binding strip the right way. I will also try using a 3/8 seams. I would like like 1 or 3 if I win.I am a follower.
ReplyDelete#3 - Civil War Reunion charm packs. Great tute! My mom has about 40 machines - she's a "collector."
ReplyDeleteMet you through the Stash Manicure post and will now follow you. We're from the same home town!
ReplyDeleteLoved the table runner! and the binding tutorial.
#3. I am already a regular follower of your blog and Stash Manicure. I bind my quilts in the exact same way. Success every time!
ReplyDeleteWell I guess I'll have to go over to a different blog to see your tutorial (was hoping I would have it handy on yours LOL). I would love #1 :0)
ReplyDeleteCrispy
Great post. Would love the lily and will charm pack
ReplyDeleteJust became a follower. I do my bindings the same way, but I love the trick to use a piece of the binding to measure how much to cut from the right-side piece and to make a pleat in the quilt! Since I have 5 quilts to bind, this will make it go much quicker! Thanks.
ReplyDeleteSo happy to become a follower of yours! I would love #2 - the Lily and Will charm packs!
ReplyDeleteI loved your tutorial & can't wait to try it. #1 would be my pick.
ReplyDeleteLoved your tutorial and picked up pointers. I actually LOVE putting on bindings and hand stitching. I will go with number three (3) and thank you for the awesome giveaway. Judy C
ReplyDeleteFANTASTIC job on the tutorial. You have come a long way with your blogging. So proud of you!
ReplyDeleteOh no, I forgot to say I am a follower of QuiltinQueen.
ReplyDeleteI am a follower now of QuiltinQueen! After that binding project, I'm sure you have more handy tips.
ReplyDeleteI would like either charm pack, please.
Marie
#3-or whatever you would prefer....Loved your tutorial - going to try the 3/8". I am now a follower of your blog and have been of Stash Manicure. Also love that you hang in your sewing room in your pjs:).
ReplyDeleteThanks for the directions on the perfect binding. THe pictures made it so much easier for me to follow. I love the table runner and all your giveaways. Thanks for the chance to win.
ReplyDeleteI'm following you now. Thanks for the great tutorial. Do you machine sew your bindings down? I'd take a charm pack, never had one before.
ReplyDeleteI follow you. Thanks very much for such a great tutorial I do mine the same but now I won't struggle through each time as I'll save your post. #2 please. Looking forward to having you back in Canada.
ReplyDeleteFollow Stash Manicure and will follow you now. I could never get the joining of the binding tails correct. Thanks for the pictures. They help.
ReplyDeleteI am a follower and love your posts. The table runner is lovely. I would love to win it.
ReplyDeleteI am a follower of you and Stash Manicure. I enjoyed your post and even learned a little something, which I posted about on Stash Manicure. Thanks for offering the giveway. I love the table runner you made, and if by chance I am the lucky one, I would choose that. Thanks again for your great tut and pictures.
ReplyDeleteI like #1. I have 9 sewing machines even though I have given away 5. I am looking to purchase #10 which is a treadle machine. I always put 1/4 inch seams but the 3/8 th inch makes sense. I use the Fons & Porter tool to miter edge of binding. Your post showed me why it works so well. Thank you for sharing your knowledge.
ReplyDeleteI like them all but #1 is first. I will try the way you finished the binding. It looks easy. I do the corners the same way as you. Thanks, for the giveaways. Nancy P.
ReplyDeleteI'm a follower!
ReplyDelete3 2 1
I do my bindings like this too and I love binding!
Hi - I just found you through Stash Manicure and I am now a follower. Your tutorial was fabulous...I loved the "pinning the big pleat" step and will try that now. I'd love to win your beautiful table runner.
ReplyDeleteWhere are you in southeast Michigan...I am in Ypsilanti? I also love hanging out in my basement quilt cave with my stash and a good movie.
In stitches,
Teresa :o)
I'm way behind you - I have 6 machines! Great tutorial. The prizes are also wonderful. I would be pleased as punch with any of them, but I had a lot of fun "shopping" and like the Charlevoix charm packs from Minick and Simpson.
ReplyDeleteThanks for a fun giveaway!
Loved your post on Stash. also love your table runner and the blog hop you all did. thought that was great. I do my binding just like you do except tor the 3/8. Will definitly try that. Number 2 please. Thank-you
ReplyDeleteGood morning from new Follower 192. *S*
ReplyDeleteI was glad to see your way of measuring exactly where to stop and make that corner turn 'cause I have a funny looking little measuring tool just liked that and never knew what to use it for.
Number 2.
Love the tute! It was a great refresher for me as sometimes my corners are a bit "soft!" Happy Valentine's Day to you! And I'd love the runner! xo, Nan
ReplyDeleteThanks for the wonderful tutorial! I never tried the trick of sewing the little 45 degree angle at the corner...brilliant!
ReplyDeleteThanks for the giveaway, too! Great prizes..I'd love the American Jane Dots and Punctuation charm pack if I were to win!
Hi Pauline! If I win I would like the Lily and Will II charm packs, though I love the table runner too. I have to make two new grandchildren baby quilts! I have 1 sewing machine, and when it was down I bought my daughter a beginner sewing machine (Bernette) so that we had a back up! Thanks for the binding tutorial. It is how I do my binding but there were a couple of tips that helped to make it better! Thanks
ReplyDeleteI am a follower here. I loved your post. I would have trouble ending my binding. You make it sound easy. I can't wait to give it a try. I would love to win 2 of ME & MY SISTER FAVORITES Charm Pack. I love the site you sent us too. It has so much to llok at and pick from. Thank you for the give away!!
ReplyDeletePauline I've commented at Stash but I want to tell you that I've not butted my binding ends up like that and I'm going to be doing that from now on - I can see how much better that is. I usually just measure the width of the binding and cut that amount but laying one end of the binding over the other will make it even more accurate. And far too often I guess at the measurement at the corner - I'll be measuring from now on. I love the little measuring tool you have - does it have a name? :) I'd love to win the Lily and Will charm packets. blessings, marlene
ReplyDeleteI've been a follower for a while and enjoyed your post at Stash Manicure. I would choose number 1. I love the table runner pattern and have downloaded it, but I have so many UFOs to finish that I don't think I will get around to making it for quite some time.
ReplyDeleteNumber 2! I'm already a follower. Thanks for the great tutorial at Stash Manicure. Your corner technique is new to me, so now I'm going to have to try it!
ReplyDeleteI was so happy to learn the binding tips, I will try sewing off the corner, that is new to me. The charm pack would be my pick, I am a follower of both blogs.
ReplyDeleteI am a fairly new quilter - have been doing my bindings similar - cutting at 2 1/2 inch but only sewing 1/4 to the top - like the idea of 3/8's. Always have trouble joining the ends - have to look it up each time I do it. this will be a great resource for me - Thank you! I would love to win charm packs - either 2 or 3.
ReplyDeleteI'm a new follower, and your tutorial was great! We all learn differently, so as a teacher, I'll show many ways to complete a goal, it helps!
ReplyDeleteI would be happy with any of the gifts, gee, too many choices! I like Moda's Dream On, and Kate Spain's new line, too. Thanks!
I'm now a follower--loved your tutorial over on Stash Manicure! It's similar to how I bind my quilts, but I love that trick of piecing the ends together to fit perfectly!
ReplyDeleteI'd love #3, a couple of charm packs of City Weekends! Thanks!
What a great tutorial! I've always thought my bindings were good enough, but not always 1 3/8th inch allowance. Sometimes use my walking foot, sometimes not. Join the last bits with a 45 degree cut but not always at the right spot. Now I know what to do every time. Thanks. I will be following you closely from now on. If yu have to give me something, I'd love #3. Thanks again.
ReplyDelete#1 I need some Valentine decorations.
ReplyDeleteI'm a new follower of your blog and your binding tutorial was excellent. Thanks!
I am a follower of Stash Manicure! Thanks for the chance to win this awesome giveaway!!
ReplyDeleteI am a follower of QuiltnQueen - would love to win prise #2. Thank you!
ReplyDeleteYour tutorial for binding is superb! Clear instructions too! Thanks for sharing.
ReplyDelete3. (Central Park and Hoopla)
ReplyDeleteDid my comment get lost in the interwebs? I was never sure of myself when connecting the binding ends, but now I think I can do it!
#3 Giddy and Oasis
ReplyDeleteI have three sewing machines and love them all. I am a follower of QuiltnQueen. The tutorial was great especially with step by step pictures!
hard choice
ReplyDeleteLove all three but guess I like the table runner
I'm a follower
thanks
email in my profile thanks
#3, Lollipops and Dilly Dally. Thanks for the tutorial, I try to use this way, but I always have to get the book out to finish the ends. I have not seen it done exactly your way and I will have to try it. I am now a follower of yours. Thanks for the giveaway.
ReplyDeleteThanks for the binding tuto. Very helpful. #3 double packs of Sunkissed (for my Birdie blocks). I already follow QuiltnQueen and also Stash Manicure. For your convenience, here is the url for the charms I like. http://www.crazyquiltgirlfabricshop.com/servlet/the-2159/moda-sunkissed-charm-pack/Detail
ReplyDeleteThank you for the fun and congrats on the lovely blog makeover, esp. the crown!
I've popped over from Stash Manicure. Thanks for the great tutorial. I always avoid mitred bindings but I'll give it a try. If I'm lucky enough to win I'd like #3 - Sunkissed. Thanks for the great giveaway.
ReplyDeleteI was absolutely delighted to see your tutorial on Stash Manicure and to find your blog. I am now a follower. I would love to win the table runner. It is beautiful.
ReplyDeletechoice 3 please. great tutorial......always helps to see how others do things.
ReplyDeleteI just became a follower!
ReplyDeleteChoice #3 - those Civil War Reunion charm packs! That store has some great stuff!
I loved the tutorial - i can never get the opening to lay flat - I will definetly try this method. i am a follower of both this blog and Stash Manicure.
ReplyDeleteChoice 2 would be perfect.
Hugs - Marie
Loved your tutorial at Stash Manicure; very helpful. I'm now your follower. #1 please and thank you.
ReplyDeleteHi Pauline!
ReplyDeleteI just left a comment on Stash Manicure about your binding process and now that I have read your synopsis .... you opened the binding and used that to measure the additional length of the right side (per the photo) of the binding? Am I correct? If so, maybe I am NOT losing as much of my mind as I had previously thought.
I am delighted to have your tutorial as well as clarification.
As for your giveaway, I'd be partial to #2.
Now I have to go subscribe to your wonderful blog as well.
Thanks a million,
Christina in Cleveland, OH
I just became a follower of QuiltnQueen. Thanks for the tutorial on binding. I think it will boost my confidence when I tackle binding my first quilt. As for the giveaway, as much as I love the runner, I think I'd opt for #3.
ReplyDeleteI am a follower of Stash Manicure and I am going to become a follower here right after I leave this comment. I choose #1 because I have a lot of unfinished projects right now and would love one so pretty as this ready to use! I like the scrappy binding and may use it in the future. I am also a Michigander, ready for a little warmth this weekend how about you? 30 would feel like a heat wave at this point! Only one machine and not a very good one at that. Saving my pennies.
ReplyDelete#2 is the one I would like, and use this email rtoms317@yahoo.com I have three sewing mashines, one is a pink singer that my aunt had given my Mom and she gave it to me. I also have a white and a brother embroidery machine that I also use to sew with and needs work. Thank you for that tut, now I think I know several things I am doing wrong. I also am a new follower of yours, so i'll be back.
ReplyDeleteI have been a follower of Stash Manicure for some time and I love the tips I find here. I would love to win #1 and in case I'm the lucky one you can find me at lovattm@hotmail.com. I do my binding almost like yours but didn't know about the stiching out to the corner before you folded the it back onto it's self, thanks. I am now a follower of yours and I'm also Canadian from cold Manitoba. It's nice to meet you. :)
ReplyDeleteLove this and I am going to try it! #3 Oasis
ReplyDeletewell I knew it...I sew believed in you..you were/are a hit...just got in and couldn't wait to see what transpired..yep, you rock...lol.
ReplyDeleteWay to go Pauline in all of her binding expertise...
2. I loved the tutorial and hoping this will help me with my ends, and make my corners a bit more like sharp corners rather than a smooth rounded edge.
ReplyDeleteThanks for the information! I Love tutorials like this! Keep them coming!
Wonderful tutorial, Pauline; now I feel better about tackling my binding! I am a follower of your blog, and Stash Manicure - as for which great prize to choose; well, a tough choice, but I think the valentine runner is just precious, and I thank you for the opportunity to win it!
ReplyDeleteI just LOVED your tutorial, as I said on Stash Manicure. Having taught myself to sew, I have never learnt the real and proper way to bind. Having you walk us through it step by step felt like I had an experienced teacher with me to teach me the right way. Thank you!
ReplyDeleteI think I would choose #3, though all choices are equally as good and I'd take any in a snap! Thank you again!
#3 - Thank you so much for the lovely giveaway and a valuable tutorial, It is so helpful for a beginner like me :)
ReplyDeleteNew Follower!
Lovely tutorial . Thank you for a great giveaway. I'm a follower.
ReplyDeleteI already follow Stash Manicure's blog
ReplyDeleteI already follow Quilt N Queen blog....I would love some SUnkissed charm packs!!
ReplyDeleteYour binding tutorial over at Stash Manicure was so inspiring.. I talked DH into that sewing machine.. whooo hooo!! Now I'm all ready, and I'm going to be sewing away by Valentines day.. I'm as giddy as a school girl!
ReplyDeleteIf I won, I would love number 3, only because I've been craving Central Park for so long and I could get the charm packs! =P
ReplyDeleteI liked how you sewed off of the binding at an angle. The tutorial I have been following is just straight off, and sometimes that makes it hard to make the mitered corner. Thanks!
I loved your tutorial over on Stash Manicure... I'm always looking to improve my binding!
ReplyDeleteWhich prize would I pick? What a difficult choice... but I think I'd pick #1!
I am new to quilting and looking for tutorials and inspiration and info, and so found your blogs. This tut is awesome, thanks so much! Following both blogs for sure! I would choose prize number 1. Beautiful!
ReplyDeleteI'd have to pick #3 and say that I couldn't live without some Chrysalis! :) It's not my style at all, but somehow I just have to get some! I love how descriptive you are on your binding when cutting and sewing the last ends together! I always just "winged" it and if it didn't work seam rip and try again! Thanks so much!
ReplyDeleteI'm a follower at Stash Manuicure and here now too! More Quilty Blogs to read...when will I ever have time to quilt? I love charm packs, you can choose anything "repro" for me if I win.
ReplyDeleteI love your table tunner and the tutorial on Stash Manicure is the best I have seen on bindings. I am a happy follower of SM and now a new follower of your blog.
ReplyDeleteWould love to win.
ReplyDeleteYour red and white runner is perfect for Valentines day. I enjoyed your post on Stash Manicure. I use the same method but I cut my bindings 2 1/4 or smaller.
ReplyDeleteI've become a follower and also follow Stash Manicure.
I would love to have Central Park charm packs if I win.
I have become a follower of your blog Pauline! I also am a follower of SM!! I cut my bindings a bit wider since I use Wool/poly batting. If I am lucky to win, I would like #2 please. Thank you for the opportunity. Cheers, Dianne
ReplyDeleteI do my corners the same way you showed on your tutorial. I like #3 Me and My Sister Favorites. Thank you for the chance. Happy Valentine's Day!
ReplyDeleteI put on my binging the same way you do BUT I never was taught to pin the pleat so you could sew the ends together easier.
ReplyDeleteI also am a follower on both.
I intend to use your binding technique to join the ends of the binding on the quilt that is coming off the frame. If I win this drawing, I would like the #3 prize. Thank you for your binding tutorial.
ReplyDeleteI would like to win the table runner!
ReplyDeleteI am a follower.
ReplyDelete3-Giddy and BELLA SOLIDS Neutral
ReplyDeleteI can't get the walking foot to work for me. Hopefully, I figure it out soon.
Great tutorial! I bind the same way you do, except I've never stitched at an angle through the corner, when I'm turning a corner ... I'll give it a try next time. I'd like #3 and Happy. I follow your blog with Google Reader.
ReplyDeleteHi, Pauline!
ReplyDeleteI'm your new follower. I have 2 sewing machine and a serger and I love that I am able to learn new tips and technique. Your tutorial is really great. I'd like #3 please, if I'm the winner.
Nice tutorial! I've always had trouble joining the ends of my bindings on the bias; maybe I will be able to do it pain free now. I would love #1! I live in SE Michigan too, though I'd like to be somewhere warmer about this time of winter.
ReplyDeleteI'm a follower. I have my beloved Bernina, 10 yrs. old and not fancy but it's just right for me. My favorite machine is my grandmother's old treadle which I learned to sew on. And I have 2 old machines from tag sales, one is a hand crank and one is a pretty Singer from the 1920s.
ReplyDeleteThanks very much for the excellent photos in your tutorial. I bookmarked it because I know I'll use your technique. I have one of those odd shaped little metal gauges and now I know what to use it for!
The charm packs are all lovely but I expecially like Antique Fair and Simple Times. Thanks very much for this chance.
I just became a follower over at Stash Manicure - my first time there, and I just became a follower here. I LOVE #1 prize - the table runner because I love red/white. It's beautiful. I loved seeing the pictures for the tutorial - it makes it so easy to follow. Thank you!
ReplyDeleteI just became a follower of your blog... and I make my bindings the same way you described. I'd love to have #1. I'm all about instant gratification!
ReplyDeleteHello from North Dakota (almost Canada!) I just became a follower at Stash Manicure and now a follower of your blog, too. These blogs are better than magazines, in my opinion. My Canadian sister-in-law taught me how to use French binding. Love it! I'd love to have #1 because your table runner looks so cheerful - perfect for a Monday morning :-) Thanks again!
ReplyDeleteThanks for the tute, it always looks like a kindergartener did my binding! I'm a follower, of course! And I love #1. I'm started this project bit it morphed into something else!
ReplyDeleteThis comment is via the google button.
ReplyDeleteThis comment is via the name/URL button.
ReplyDeleteThis is the easiest method I have ever seen for the professional finish I am looking for in binding my quilts. I am just at that point with my latest and will definitely be trying it. Can't wait!
ReplyDeleteI'm anew follower here and would love to have the tablerunner (1). I will try your way to get the right length of the ends next time..
ReplyDeleteleft a post (#70) don't know if I left my e-mail
ReplyDeleteI'm a newbie at quilting, and have to admit the binding is horrible for me to do; I know, I know, you experienced quilters have it all figured out, but I appreciate any and all tutorials I can find on the subject, especially when they are easy to understand. I love that tablerunner...(sigh) I wish I could sew that good. ;)
ReplyDeleteDesi
#2 A great tutuorial and I appreciated the photos to go along with it as I am a "have to see it done" person.
ReplyDeleteI already follow your blog and I am also following Stash Manicure.
lsandes@comcast.net
Hi Pauline, loved your tutorial which will be very helpful to me. I am already a follower at stash manicure, and I am now a follower of your blog. I would love #3 prizi if I won-so love choosing fabrics! :)
ReplyDeletesandangels1945@hotmail.com
I would love to win #3, and I am a follower. I love charm packs so this is a wonderful giveaway.
ReplyDeleteMicki
I am a follower.
ReplyDeleteMicki