...have you noticed we are seeing more and more embroidery designs in quilts..
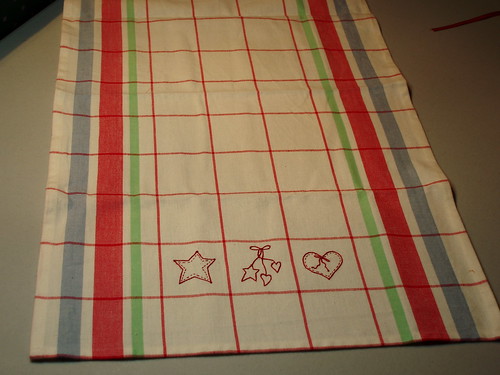
....and embroidered tea towels are making a big comeback.
I love doing embroidery...I find it very relaxing.
I use a # 11 embroidery needle....it is nice and fine....
I do not use a hoop.....
I almost always use 2 strands of floss ...
and I take very small stitches....
I prefer to stop and restart...... instead of traveling.

I use a # 11 embroidery needle....it is nice and fine....
I do not use a hoop.....
I almost always use 2 strands of floss ...
and I take very small stitches....
I prefer to stop and restart...... instead of traveling.
I am one of those quilters that likes the back of my blocks to look neat....
and the back of my embroidery projects....
... especially my embroidered tea towels.
I try to avoid all knots if I can.
Here is how I start my stitcheries.....
I start with one strand of floss about 36 inches long,
I fold the floss so the cut ends are together...
...thread both cut ends through the eye of your embroidery needle.
from the front of your block stitch through to the back side
leaving the small loop showing on the front...now....
take a very tiny stitch and bring the needle back to the front
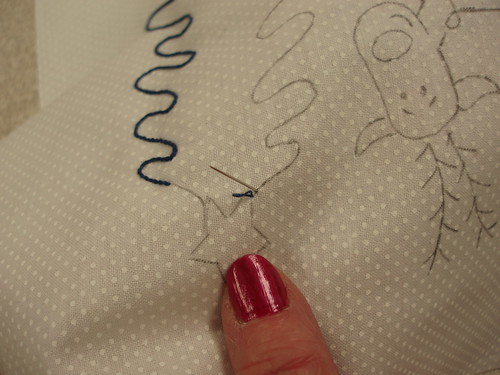
you will have a loop on the front...put your needle into the loop
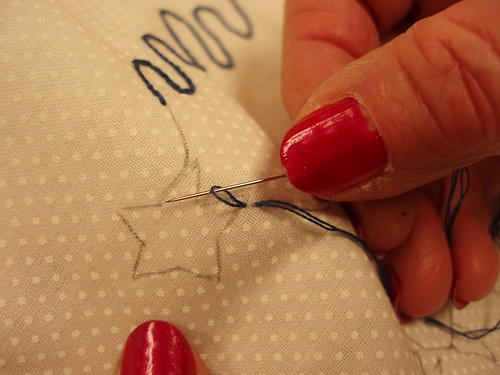
gently pull the loop tight and you have your first tiny stitch.
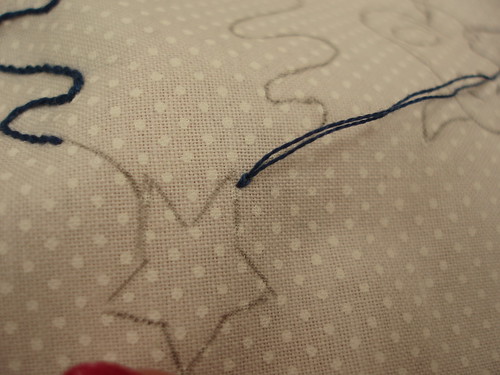
...you can now continue to stitch your design
using tiny stitches especially on the curves and points.
This works well when doing french knots too.
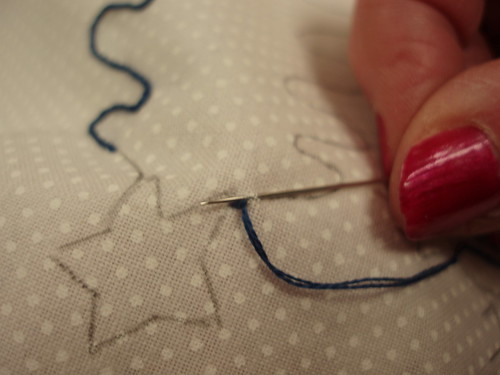
When your floss is getting short bring your needle to the back
and slide your needle under 3 or 4 stitches to secure the end.
Trim threads.
This method makes for a neat back
but can be used only when you want to stitch with 2, 4 or 6 strands of floss.
If you have any questions please feel free to email me
or leave me a comment and I will email you back.
... especially my embroidered tea towels.
I try to avoid all knots if I can.
Here is how I start my stitcheries.....
I start with one strand of floss about 36 inches long,
I fold the floss so the cut ends are together...
...thread both cut ends through the eye of your embroidery needle.
from the front of your block stitch through to the back side
leaving the small loop showing on the front...now....
take a very tiny stitch and bring the needle back to the front

you will have a loop on the front...put your needle into the loop

gently pull the loop tight and you have your first tiny stitch.

...you can now continue to stitch your design
using tiny stitches especially on the curves and points.
This works well when doing french knots too.

When your floss is getting short bring your needle to the back
and slide your needle under 3 or 4 stitches to secure the end.
Trim threads.
This method makes for a neat back
but can be used only when you want to stitch with 2, 4 or 6 strands of floss.
If you have any questions please feel free to email me
or leave me a comment and I will email you back.

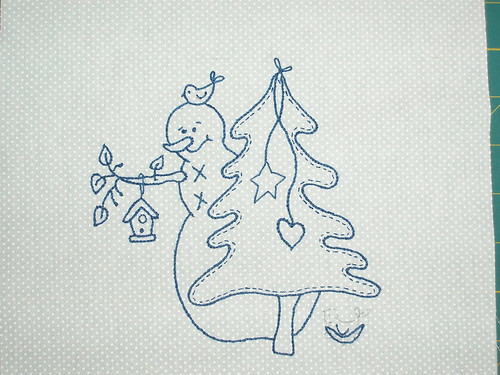
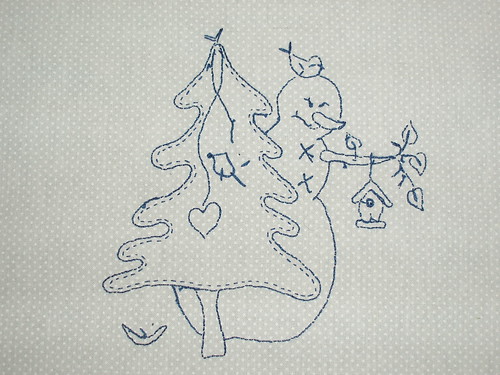
Enjoyed this post very much, and am eager to try this.
ReplyDeleteHad a giggle at the back of your project. The snowman on the back looks pretty grumpy!
Thank yo for this helpful hint. I too had to giggle at the snowman's grumpy face on the reverse side.
ReplyDeleteLooking forward to your post on Stash Manicure. I can use help with bindings. (o:
Thank you & hugs.
Thanks for the tip on starting. I've been embroidering for many years and have never seen this idea before! I too like a neat back. I usually run the ends from both the start and the end under several stiches. I'll definitely be trying your method.
ReplyDeleteGreat hint. The back of my embroidery is a mess. I'm changing my ways.....grin.
ReplyDeleteYour work is gorgeous!! I actually commented on a post at "Sew Many Ways" right after you did. Your comment said you live in SE Michigan so curiosity (nosiness??) too over and I hopped over here to see where in MI you live since I live in SE MI too. Surprise, surprise!! I live in Canton as well! We've probably seen each other at Meijer or Target sometime. Small world! ;) Small, snowy world currently!!
ReplyDeleteThanks for the great tip! I was getting tired of all of those knots.
ReplyDeleteWonderful tip! I do love stitching too. It really is so relaxing.
ReplyDeletexx, shell
Beautiful! Thanks so much for the tutorial!! Wonderful tips when it comes time for me to try this. It's on my long list of new things to try.
ReplyDeleteThis is a great tutorial. Thank you for such a wonderful embroidery tip! Who knew that it could be as easy as that?? How can I have been doing embroidery for all this time and not know that?
ReplyDeleteThank you for sharing.
How did you go with the snow storm??
I'm inspired to make my backs neater now that I know how!
ReplyDeleteI have been stitching for years, redwork, bluework, etc... I have never heard this tip. Thank you so much. I too stop & start, but now I won't have any knots.
ReplyDeleteThanks so much.
WOW great tutorial Pauline!!! I've saved this in my favorites for the next time I need to do embroidery :0)
ReplyDeleteCrispy
Great tip and tutorial. I just recently got back into embroidery and I'll be sure to use this in my projects. Thanks.
ReplyDeleteGreat project think I will try this with the kids this weekend.Thanks for sharing.
ReplyDeleteNice tutorial. Your nails look great, btw!! I loved learning this from you in person. Thanks for helping all of us become better stitchers!!!!
ReplyDeleteTHANK YOU for the starting tip! I've never seen that before and do some embroidery, so this will help greatly! Your stitching is beautiful - hope mine will get better with practice.
ReplyDeleteNice tutorial. However, I would caution one to use this technique on something that would be considered an "heirloom"
ReplyDeleteFloss has a grain, and when you draw your fingers down it you can feel that one direction is "fuzzier" than the other. By doubling the thread, you are now working with the two strands each going in different directions. I suppose as long as you do this all the time it won't show, but your stitching will have subtle differences due to the plies going in different directions. Much like cutting two pieces of velvet or corduroy each going in different direction.
Hope this makes sense. WIsh eliminating knots was that easy.
This is a wonderful tutorial ... thank you :) I used the same technique with my cross stitching but didn't know if it'd work with embroidery as I'm just now transitioning into embroidery and am trying to soak up every embroidery tip I can. I love making the back look as good as the front too ... it's what I do :) lol Can't wait to see what you share on Stash Manicure!!
ReplyDeleteWell, I will have to say that is one of the handiest little embroidery tricks I've ever seen! I will use that new technique and think of you everytime!
ReplyDeleteBlessings
Gmama Jane
Great tip, I will just give that a try. Looks like it should work and leave little bulk. I love doing tea towels also, and I found that they make great gifts that everyone loves. Paired with a crocheted dish cloth makes a great gift. Thanks for the tip, glad I stumbbled on your blog.
ReplyDeleteI'm now a follower after finding you via Stash Manicure. I have a lot to learn so thanks for sharing techniques and tips and tricks. Much appreciated.
ReplyDeleteFabulous tip! I have used a similar method when I'm cross-stitching...never thought of trying it with stitchery!
ReplyDeleteGreat post on stash manicure today Pauline. Applause, applause! Ann
ReplyDeleteFollowing you from Stash Manicure. I love the table runner. Your tutorial was great!
ReplyDeleteI learned basic embroidery as a child, but was never taught not to knot. This is the simplest tutorial for beginning a project I've come across. Thank you!
ReplyDelete